
Short recap on what is Git: Git is a distributed repository. Everyone has its own copy of all files from the project (Repo) stored on their computer. Advantage of Git is that every user in the project team can work offline. In this post we take a closer look on the commands that are available in Git and when they can be used.
Here we take a look at the first part after installing the Git Shell. We are going to supply Git with a username and e-mail address:
git config –global user.name “Mark Scholman”
git config –global user.email user@domain.com
![]()
It is possible to change your email for example also per repo or per system. Instead of using –global you can use:
git config –system user.email user@domain.com – This is a setting on the system config file.
git config –local user.email user@domain.com – This is a setting on the Repo Config file.
In my blogpost on using Git for PowerShell Versioning with Visual Studio Online we initiated the Repo on VS Online and cloned it to our computer. In the next steps we do it the other way around. Let’s assume you already have a folder with scripts or a project in it.
Open git shell and navigate to the folder where the project or scripts are located. Now type “git init”. This will initialize the folder as a git repo and as you see in the screenshot there is 1 file to add the staging area. That is because we added the folder we want as root for our repo and when initialized it added those file to the staging area of the repository:
![]()
The file that is in the folder is called readme.txt, let’s add this to the staging area by entering git add readme.txt. If you have a bunch of files and folders under the root and you want to add them all at once use git add . Or git add –all :
![]()
Next thing we need to do is to commit this change by entering git commit readme.txt –m “Add readme”. Again if you have a bunch of files to check in at once you can use git commit . –m “Init project upload”. This will commit them all at once:

When we run a git status we see that on the branch master there is nothing to commit and the working directory is clean:
![]()
If we added a new file called license and we are going to edit the readme.txt and run a git status we see the following output. We noticed that there is 1 file changed and 1 file is ready to be added to the staging area (it is untracked now):

If I want to add the new untracked file and the changed file at once to the staging area I can type git add . or git add –all. :
![]()
And finally commit the changes:

So let’s summarize the colors and numbers we saw during these commands at the end of the current directory and what do they mean to us:
[master+1~1-0!]
master : The current Branch we are working in. Branches will be explained later
+1 : Files that are added
~1 : Files that are modified
-0 : Files that are removed
! : Untracked files that are pending. Is gone when all files are in staging area
Note that the exclamation mark may also be standing between the symbol and the number like: [master +1 ~!1 –!1], that means there are conflict when you try to merge branches for example.
If the numbers are red it means that there are unstaged files and if they are green they are staged and ready to commit. You noticed that the master color is blue. When we commit the changes you notice that the color of master becomes green. After we pushed them to GitHub or VSOnline the color becomes blue again. In our example above we were only working on the local repo and didn’t even pushed it to an online repo so it remains blue. We will do this in the next step. So you see that even without an online server we can start using git.
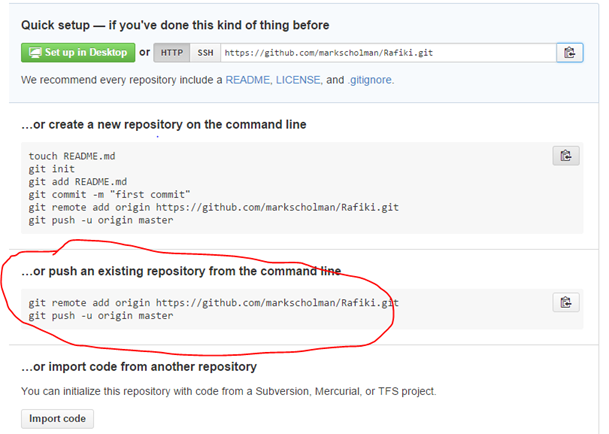
In the next step we are going to add this local repository to GitHub / VSOnline. I created a repository and message tells me to run git remote add origin https://github.com/markscholman/Rafiki.git
Or in VSOnline:

But after I ran that command it tells me fatal error: remote origin already exist (I experienced this with VSOnline as well with GitHub):
![]()
When I take a look at with the command git remote –v it did exist:
![]()
So we need to use another command to set the local repo against the GitHub url. Use git remote set-url
![]()
Now use git push –u origin master to push the local repo to GitHub. The –u is used so the next time we only need to run git push. This is remembered for the repository and don’t need to be reentered when you switched repositories for example.

When we log in to GitHub we see the file:

And in VSOnline:

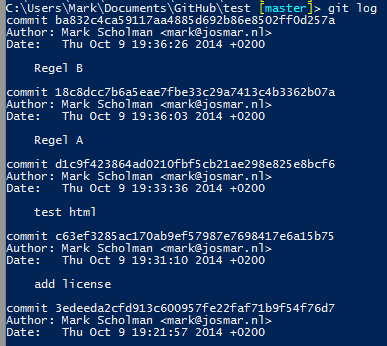
We have done some commits to the repo. I added Rule A to the test.html file, commited the change, then I added Rule B and commited and pushed the change again. When I look at the change log by running git log:
I can shorten this output by running git log –oneline

Let’s assume after I added Rule B the whole script is broken. I need to revert back to the commit from Rule A. This can be done with a git reset –hard HEAD^
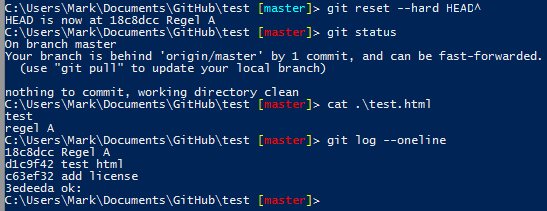
We see that when we did this the local repository is now behind of the origin/master (online) and when we look at the file and log we see we reverted back the last commit. You cannot commit the changes to the same online branch (master) by using git commit . –m “Restored”.This is because we pushed the last changes directly to the online repository. What I need to do now is to create a new branch for our restore. So now I type git branch restore:

A branch is a full copy of the master where we can create modification apart from the master branch. This becomes useful when you working on some features for a project on a separate team and you also need to update the production branch.
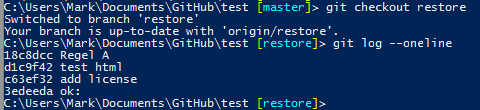
Now we need to switch to the restore branch. We can see in the new branch the log is still till rule A and we can now commit the new branch

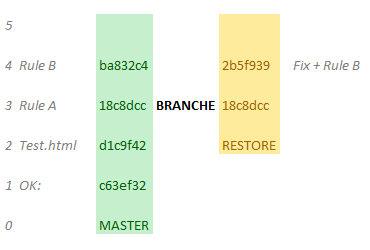
To visualize what we have done I created this diagram. The green run is the original were we started off with. When we started the restore we created a new lane aside from the master lane. It is now running independed from each other until we merge or rebase them again. :

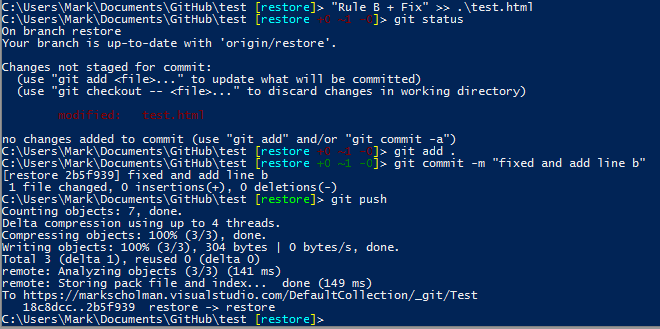
So next we fixed in the restore branch Rule B with the new fix, added it to staging and committed the change:
If we add this to the diagram created earlier it looks like this:
Now we need to merge the Restore branch back into the master branch. We switched back to the master branch and remove the test.html which we screwed up. Use git rm test.html to remove the file from the master branch. Next we run git merge restore to merge the restore branch into the master branch. Normally I there is a better way to handle conflicts but I found out that in Windows the conflict handling doesn’t work the way it should. By using this method I can simple merge the restore back in to the master branch:

Now add the file to the staging area and then commit:

Now push the repo to GitHub by running git push.
Now on the local and remote repo delete the branch:
git branch –D restore
git branch –r –D origin/restore
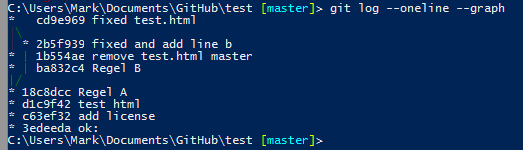
When we look at the log and use the –graph parameter we see the merge back from 2 lanes to 1 lane:
You see that if you did pushed your repo to your online repository it takes a lot of effort to revert back to an earlier commit. As long you didn’t pushed your repo to GitHub or VSOnline the git reset –hard HEAD^ will be enough to revert back to the last commit or git reset –hard HEAD^^ for the last 2 commits to revert. You can use git reset –soft HEAD^ to undo a commit back to staging area. This might be useful if you want to add some more files to the staging area what needs to be in the same commit.
I advise you to get started with a test project and play with files and git commands to see what happens. For example when switching branches and files are not available in other branches you won’t see them in you directory anymore. This can be panicking the first time when you experience this, I did at least. When you switch back, the changes and commits that belong to that branch are back. There a lot more commands available in git like rebase instead of merging also with recovering files from commits there are some need features available. I will discuss this topic in a future blog post.